Friday, December 11, 2009

Pumpkin Chocolate Chip Cookies

I meant to post this recipe a month ago (for Thanksgiving), but pumpkin is a Fall and Winter fruit in my opinion so I hope you have an opportunity to make these if you'd like :).  These cookies are a favorite in my family and my husband's family (and at church, and with friends, etc.).  Pretty much everyone who has tried them has loved them, so they're almost a 100% guarantee with any crowd :).

Combine:
3 cups pumpkin (this is 1-1/2 15oz. cans of pumpkin - I use Libby's)
3 cups sugar
1-1/2 c. oil
3 eggs


Mix together in a separate bowl:
6 cups flour
6 tsp. baking powder
3 tsp. cinnamon
1-1/2 tsp. salt


In another small bowl, mix 3 tsp. baking soda in 3 tsp. milk (sorry, I don't have a picture of this).

Add the dry ingredients to the pumpkin mixture, along with the soda/milk mixture.


Mix together well :).  More flour may be needed, but the batter will be very sticky, so I usually don't worry about adding any.


Stir in 3 cups of chocolate chips and 3 tsp. vanilla.


Bake at 375* for 10-12 minutes on a greased or non-stick cookie sheet.  I've found that 11 minutes bakes them perfectly for me, but you'll be able to tell after the first couple of batches come out of the oven if that's the right amount of time for you :).  Also, I use an ice cream scoop to put the batter onto the cookie sheet.  It helps a lot, since the batter is so sticky :).


These are very light and fluffy, as you can probably tell from the pictures, and they have an almost cakey texture.  They're amazing and they stay moist, even after sitting for a week (if they're not eaten by then!) :)

Please let me know if you make these and what you think.  Enjoy!!! :)

Wednesday, November 11, 2009

(Lemon) Poppy Seed Bread

I'm finally posting the requested and long-awaited recipe for poppy seed bread :).  I have a great recipe I got from my mother-in-law, but the request was for lemon poppy seed bread.  I'll give you the "classic" recipe first and then tell you how to add the yummy lemon flavor :).  I always make it into bread, but it can easily be made into muffins if you prefer.

Ingredients:

3 eggs
2-1/4 cups sugar
1 cup oil
1-1/2 cup milk
1-1/2 teaspoon almond extract
1-1/2 teaspoon butter extract
1-1/2 teaspoon vanilla extract
3 cups flour
1 teaspoon salt
1-1/2 teaspoon baking powder (NOT soda)
1-1/2 Tablespoon poppy seeds

This is super easy to mix together.  Add about 2 ingredients at a time and use a whisk to stir thoroughly together after adding each pair.  For example, put the eggs and sugar in the bowl - mix.  Add the oil and milk, then mix.  Add the extracts and mix.  Add the dry ingredients and mix.  That way the batter is smooth and all of the ingredients are fully incorporated.  You can use an electric mixer if you prefer, but it's not really necessary :).

Here are the liquid ingredients (+ sugar) mixed together:


Here are all the ingredients mixed together, ready to be poured into the bread pans:


Pour into 2 greased (I use Pam cooking spray) bread pans and bake at 350* (Fahrenheit) for 1 hour (I've had to leave it in the oven for an extra 5 minutes so that the center is fully cooked).  It will be nice and golden on the top.  This recipe is really yummy, moist, and I get tons of compliments every time I make it!

To add the lemon flavor, here is what you need to do:
1 - add 2 teaspoons of lemon extract
2 - add the zest of one lemon (I use a small grater and grate the peel directly onto the batter in the bowl)

I tried to show myself grating the peel, but it was very difficult with only two hands :).


Here's the lemon zest, ready to be mixed into the batter:


If you don't have lemon extract, you can substitute 1 Tablespoon of lemon juice (or use the juice from the lemon you used for the zest).  Just know that the lemon flavoring won't be quite as strong this way.  Stir in the zest and extract/juice (whichever you choose) and follow the baking guidelines for the classic recipe above.

I just recently came up with the lemon option and when I brought the bread to church, I had multiple people ask me for the recipe :).  I'm relieved that I didn't ruin the recipe! :)

As an option for either recipe (classic or lemon), you can add a glaze to the top.  I've never done this, because I love the bread on its own, but I think it would compliment the lemon poppy seed bread nicely.


1/4 cup orange juice
3/4 cup sugar
1/2 teaspoon almond extract
1/2 teaspoon butter extract
1/2 teaspoon vanilla extract


Mix together in a small saucepan.  Boil for 3-4 minutes.  Pour hot glaze over loaves.

One more option I tried and enjoyed was adding raw sugar granules on top of the bread after it had been in the oven for about 45 minutes.  That way, when it's done there's a slight crunch on the top and it looks more like the muffins from Starbucks and other coffee shops ;).

FINALLY, if you'd like to use the recipe to make muffins instead of bread, you will probably only need to bake them for 40-45 minutes, but I haven't tried that yet, so you'll probably want to watch them closely and take them out of the oven when the tops are golden.

Here's the finished product, ready to be devoured, yum! :)


Sorry the picture is blurry, but I was probably so excited about it being fresh out of the oven that I couldn't contain my excitement! ;)


Ok, I think I covered everything.  If you have any questions or if I didn't make something clear, please let me know :).  This really is a simple recipe and as long as you have all the ingredients on hand, it takes very little preparation time.  Then you just throw it in the oven and viola! :)

Thanks for stopping by and please let me know if you try it (and what you think!).  Have a great day! :)

Upcoming Recipes

Hey everyone, I'm sorry for the delay in posting, but I have been swamped!  I just wanted to let you know that I have a few recipes coming up and I will start posting them tonight :).  Here are just a few of the ones on my list:

1 - Poppy seed bread (w/ the option to make it lemon flavored)
2 - Chicken parmigiana
3 - Shortbread (easiest & quickest recipe ever!)

Also, if you have any suggestions of recipes you'd like to see, let me know and I'll try my best to come up with a tasty one for you! :)  I love to experiment :D.  Have a great day and I'll be back tonight!

Thursday, October 29, 2009

Easy Pumpkin Cupcakes!

Pumcakes?  Pumcups?  Kincakes?  I think I like pumcakes best :).  Anyway, I was on twitter the other day when TiffanyD (a youtube beauty guru & blogger) posted a recipe for pumpkin cupcakes.  Since it's Fall and I love learning new Fall-y recipes, I decided to try this out.  Except, as with most recipes I try, I had to change it to suit my mood :).

Start out with a box cake.  She used a basic yellow cake, but I felt like using a spice cake.  I just thought the flavors would compliment each other nicely :).


Mix the cake as directed, except substitute one 15oz. can of pumpkin (I like Libby's best) for the water.  Also, add 1/2 tsp. of pumpkin pie spice and mix all together.  My mix called for 1/3 cup of oil and 3 eggs, so to spell it out plainly, here are the ingredients I used:

1 box spice cake mix
1/3 cup oil
3 eggs
15oz. can pumpkin
1/2 tsp. pumpkin pie spice


Spoon the batter into muffin cups and bake for 18-20 minutes in the oven preheated to 350*.


When they're done baking, put them on a cooling rack for about 30 minutes or until cool.  Frost with cream cheese frosting.


Eat... and enjoy! :)


p.s. - sorry for the poor picture quality... I took them with my iphone because our camera battery died... and I'm too lazy (forgetful?) to recharge it :).

More recipes to come soon!!!  If you have any requests, let me know :).

Saturday, October 10, 2009

Stuffed Bell Peppers

I was never a fan of bell peppers.  Something about the unique taste just never appealed to me until Jason's mom (my mother-in-law) made this recipe.  I still don't eat red or yellow bell peppers, but I really enjoy green ones now, all because of this delicious and filling recipe.

I have to add that I've tried a couple of other stuffed peppers (that other people made) and they didn't taste nearly as good as these :).  So... on to the recipe.  It's fairly simple, but you'll see that there are quite a few steps and it is time consuming.  So make sure that you plan ahead to make these on a night that you have plenty of time.

Here are the ingredients... I'll explain what to do with them as I go along :).
6 peppers
1 to 1.5 lbs ground beef
2 Tablespoons onion (yuck, I either use onion powder or minced onion)
1 tsp. salt
1/4 tsp. garlic salt
2-3 cups cooked rice
2- 15oz cans tomato sauce
1-2 cups shredded cheese

First, you need to cut the tops off of the peppers and remove the insides.


Bring a large pot of water to a rolling boil.  Boil the peppers for 5 minutes and set aside in a baking dish.


Make enough rice to have 2-3 cups cooked.  Brown the ground beef.


Once the rice and beef are cooked, I combine them in the large pot that was used to boil the peppers.  Add one can of tomato sauce and the seasonings & stir together.  Taste the mixture to make sure it is seasoned to your liking and add more if needed.


Stuff the peppers (Jason likes them overstuffed) and place back in the baking dish.


Pour the other can of tomato sauce over the peppers.


Cover with foil and bake at 350* for 45 minutes.  Remove foil and cover peppers with cheese.  Cook for another 15 minutes.


Enjoy!  One pepper is usually more than enough for a meal for me and Jason usually eats two... then we have enough left for lunch the next day :).

Friday, October 9, 2009

Buttermilk Raspberry Cake

Growing up, my mom had a large raspberry "patch" (as well as strawberries and rhubarb) behind our house.  Every summer, we would have to go out each day to pick a bowl-ful of fresh raspberries.  Whenever she sent me out, she was lucky I brought any inside, because I loved to just eat them as I picked!  Anyway... anytime I come across a recipe that involves raspberries, strawberries, or rhubarb, I jump at the chance to make it because I really really really love the taste of them!

This cake isn't like a "birthday" cake or anything like that.  It's more like a breakfast/coffee cake and it's oh so delicious!!!

Start out by mixing the following ingredients together:
1-1/2 cup sugar
1/2 cup oil (vegetable or light olive oil are what I usually use)
1 egg

After mixing the above together well, add and mix the following:
1 cup buttermilk
1 tsp. vanilla

Add the following dry ingredients to the above "concoction" and mix together:
2 cups flour
1 tsp. soda
1/2 tsp salt


Pour the batter into a 9x13" cake pan.  Spoon 2 cups of raspberries on top (you can also use strawberries, blackberries, boysenberries, etc.).  Sometimes I put the berries on whole, other times I like to mash them up and put them on like that, which is what I did this time.


In a separate small bowl, mix the following together:
1/4 cup sugar
1/4 cup brown sugar
2 tsp. cinnamon


Sprinkle this on the top of the cake and bake it at 350* for 40-45 minutes.  The cake will probably look a little odd when it's done cooking, because the berries usually move away from the edge of the dish.  But don't worry!!!  It will still taste super delicious :).  This is one of my favorite dishes to make for brunches & breakfasts :).


Good luck and let me know if you try this!

Sunday, September 27, 2009

Kitchenaid Stand Mixer!

Eeeeeeee, I'm so excited!!! My (3rd) wedding anniversary was September 2nd and my husband bought me a KitchenAid food processor (which is what I asked for, really!). He said it was a smaller model than he wanted to buy, though, and that he was originally going to buy me a stand mixer. He told me that I should take the processor back to Target and exchange it for whichever appliance I wanted more, so after a few days of thinking, I returned it and came home with this baby:


I'm so excited to start using it! I'll have to bake something just so I can use it :).  I'm even more excited because I was able to get a special "Cook for the Cure" edition, which means a $40 donation will be made to the Susan G Komen (breast cancer research) foundation from my purchase.  I got it on sale because it was on closeout, but I think it's really cool... it has a pretty pink stripe on it :D.

Anyway, I just had to share this with you and thank my amazing husband for this great gift.  I originally had this on our wedding registry and since then it's been on every birthday and Christmas list for the past 3 years :P.  Having this will make baking so much easier, especially when Thanksgiving and Christmas come around, because I always find myself trying to make about 10 different things at the same time :).

What's your favorite appliance or tool to use when baking?  Do you have a favorite brand?  I've been really pleased with the quality of KitchenAid products so far :).  I hope this lives up to my expectations!

Friday, September 25, 2009

Mom's Sugar Cookies!

I have made these quite a few times this year for church events and other get-togethers and they're always a huge hit :). They take some time and work, but they're worth it!!!

Ingredients:
1 cup butter - softened
1/2 cup shortening (I didn't say they were healthy)
2 cups sugar
4 eggs
1-1/4 tsp. lemon extract (the secret ingredient!)
5 cups flour
2 tsp. baking POWDER (not soda!!!)
2 tsp. salt

This makes a lot of cookies so cut it in half if you'd like :).

Blend butter & shortening, sugar, eggs, and lemon extract. Stir in flour, baking powder, & salt. Cover & chill for at least 1 hour.


Roll out on a flour-covered surface (I use my kitchen countertop), and use cookie cutters or a round cup to cut into shapes.


Bake in the oven at 350* for about 9-11 minutes or until they're starting to get golden brown around the edges. If they cook too long, they will be crunchy and not quite as good, so keep an eye on them.


Allow them to cool before frosting. My mom makes her frosting out of powdered sugar, butter, milk, vanilla, and food coloring, but by the time I'm finished mixing and baking the cookies, I usually resort to using a container of Betty Crocker or Duncan Hines frosting and I also like to add sprinkles :D. They make me feel like a kid again!

Lex's Famous Seak Rub

Well... it's famous in our house :). I've been experimenting with marinades and rubs for the past 6 months or so and this one really is a winner. I was a little worried about the ones I made with a significant amount of brown sugar, but this one doesn't seem to thicken or stick to the pan/grill really at all.

Here are all of the spices needed for the rub... very simple!

Just in case you can't see all of them (sorry for the poor picture quality), they are as follows: minced garlic, black pepper, Lawry's Seasoning Salt, Onion Powder, Parsley flakes, and Brown Sugar. I usually just throw things into a bowl without measuring, but for the sake of sharing it with you, I tried to estimate amounts when I made it for tonight's dinner :).

For 2- 10oz. steaks or 1- 22oz. flat iron steak (what I made tonight):

1/4 c. brown sugar
1/2 tsp. Lawry's seasoning salt
1/4 tsp. onion powder
1/2 tsp. parsley flakes
1/2 tsp. minced garlic
1/8 tsp. (or less = a "dash") black pepper

I stir all of this together in a bowl with a fork and this is how it should look:


In a baking dish or tupperware or any other container you can seal, place the steak and sprinkle half of the rub on one side. Use your fingers to massage it into the meat, taking care to cover the entire surface. Turn steak over and use the rest of the rub.


Seal the steak (tupperware lid, plastic wrap, and foil are all good options) in the container of your choice and chill in the fridge for at least 30 minutes. When it's ready, cook to your desired done-ness (yes, I just made up the word), and eat. Our favorite ways to cook it are 1) on our gas grill outside (amazing flavor!), and 2) broiling in the oven for 15 minutes (without turning the steak - will be on the rare side of medium-rare).


Good luck! Let me know if you try it and what you think :).

Friday, August 7, 2009

Basic Spaghetti Sauce

Hey everyone, I hope you're having a splendid week. Yay for Friday! I wanted to post a super easy recipe that I use almost weekly for a variety of dishes: basic spaghetti sauce. I use the smell test for this (smell test = smell spices and add whatever smells like it would taste good in the recipe) and have come up with what I think is a good combination of ingredients :).

Start with a can of tomato sauce... I always use Hunt's brand. You can use a small can or large, depending on what kind of pasta you're making the sauce for. It's all up to you! Let it warm up a bit, but don't put it on high heat or you'll have sauce splattering everywhere :).

While it's in a pot on the stove, I add the following spices:
*Minced Garlic (1/2 tsp?)
*Oregano (1 tsp)
*Parsley (1 tsp)
*dash of salt & pepper
*Grated Parmesan cheese (Kraft or whatever brand is fine) - I eventually add probably about 1/8-1/4 c.

Add the spices and stir... I sprinkle a little of the Parmesan cheese into the mix until I get a taste I like. I like my sauce to be a little cheesy :).

So basically, here's what I do for meat spaghetti:
Brown the beef and drain.
Add tomato sauce.
Add spices and stir, taste.
Add more spices/cheese, stir, taste.
Add more cheese, stir, taste.

This continues until I think it's yummy enough to serve :). This sauce goes great with spaghetti noodles, angel hair noodles (our favorite), and tortellini (another favorite).

If you want to try the tortellini, I highly suggest this recipe:
Dice up raw skinless & boneless chicken breasts. Put olive oil in a pan, add chicken and cook until you can cut a piece easily with the turner/spatula. Then, you can either make the sauce (basic sauce recipe above) in the same pan as the chicken or make it in a separate pot and dump it in with the chicken when you're done.

In a separate pot, boil about 4-6 cups of water and add the tortellini. Our favorite brand is Buitoni and we usually get the "three cheese" kind. Put the tortellini in the water and boil for about 10 minutes, or until it's soft enough to eat. Combine the chicken, sauce, and pasta together in a bowl and serve! This is also yummy with some sweet corn added :).

Anyway, that's about it for the sauce :). I posted 3 recipes in the same post!!! Good luck and please let me know if you try any of them :). Have a great weekend!

Friday, July 31, 2009

Julie & Julia

I've been psyched out of my mind since I saw the previews for this movie. And today I came across Julie's actual blog!!! How cool is that?! :) I added it in the sidebar (my favorite blogs), but I'll post it here too :)

The title is "What could happen?"
http://juliepowell.blogspot.com/

Also, at the bottom of my blog list, you'll see the link to her original blog, from 2002-2004 :).

Happy cooking!

Monday, July 20, 2009

Swedish Meatballs!

This was one of my favorite meals when I was growing up. Whenever mom made it, she would just use a packet of seasoning for the meatballs and the sauce/gravy. Well... I was at the grocery store tonight and I realized I hadn't eaten SM's in years and it sounded really good, but I couldn't find a seasoning packet anywhere! "Oh well, that's ok" I thought... "I'll just find a recipe!", which is one of my favorite things to do :D. Besides, I'm about 25% Swedish, so I was feeling confident :D. I found a couple recipes on www.allrecipes.com that I kind-of combined (and added my own personal flair to) and the details are below :).

First thing to do is make the meatballs:

*1.25 lbs of ground beef (I use 93% lean)
*1 cup bread crumbs (you can use regular bread crumbs or I used Italian seasoned ones that were store-bought)
*4 Tbsp. evaporated milk
*1/4 tsp ground nutmeg
*1 tsp salt
*1/4 tsp pepper
*1 egg (beaten)
*1/2 tsp onion powder
*1/4 cup dried minced onion
*1/4 tsp parsley

In one bowl, put the breadcrumbs and evaporated milk together, stir. In another larger bowl, put the beef, nutmeg, salt, pepper, onion stuff, parsley, and egg. Add the bread crumb mix and knead with your hands until all mixed together. Grab about 2 tablespoons worth of meat mix and roll it up in your hands to make a meatball. Set aside on a cookie sheet/wax paper/or some other non-stick surface. Roll up the rest of the meatballs.

In a non-stick pan, put about 4-6 Tablespoons of butter and put on stovetop at medium-high heat. Once the butter is melted, add about half of the meatballs and allow to brown thoroughly. Shake the pan slightly to turn the meatballs until they're uniformly brown (I also had to use a pair of tongs, because the shaking didn't do the best job). Cook the other half of meatballs and set all aside.

Sauce:

*Rest of the can of Evaporated Milk
*1 can Cream of Chicken Soup
*1 can Cream of Mushroom Soup
*Dash of Pepper
*1/4 tsp. salt (or to taste)

Put in small pot and cook on low-medium until smooth and hot. I stirred with a whisk to help it all mix together :).

Finally, cook up some egg noodles or rice. Most people eat Swedish Meatballs with noodles, but I grew up eating them on rice. I just realized tonight that that's probably because my dad hates noodles, but I like them both ways :). Here's a picture of the final result:


Let me know if you have any questions and if you try to make this yourself! Good luck :).

Tuesday, June 30, 2009

Ground Beef Soup for Crock Pot

This is a recipe/soup that I came up with by myself right after graduating from college, when I had to start feeding myself :P. I used the "smell test", which is basically this: go through your pantry/cupboards and smell your spices. If one smells like something you would want to include in the food you're making, add it! I ended up using a lot of spices, but most of them are pretty common, so hopefully you won't have any problems with finding everything. I gathered everything up for a group picture!


In case you can't see everything, here's a list of ingredients:
Rubbed thyme (dash)
Onion Powder (couple of dashes)
Minced Garlic (1/2 tsp.?)
Ground Cayenne Red Pepper (teeny teeny dash)
Cilantro Leaves (couple of shakes)
Whole Kernel Corn - I highly recommend the Del Monte brand
Oregano leaves (couple of shakes)
Cut Green Beans (again, I recommend Del Monte)
Ground Cumin (a few shakes)
Hunt's tomato sauce (1-1.5 cans)
Minced/chopped onions (I use the dried kind, but you can use real onions if you want to) - a few tablespoons
Chili Powder - a couple tablespoons
Salt & Pepper (in our snowmen shakers - it's Christmas year-round!) - season to taste
A couple of medium-sized potatoes
A couple of medium-sized carrots
1 Celery stalk
Approximately 1 pound ground beef (I like the 93% lean/7% fat ratio)

To start, brown the beef and set aside - I actually like to strain the beef to get all of the fat out and then let it sit until I'm ready for it. Peel the potatoes and carrots and wash the celery. I like to slice the celery and carrots nice and thin so that they aren't crunchy in the soup. Cut the potatoes in small-ish cubes, but not too small or they might just dissolve.


Pour the tomato sauce, corn, and green beans into the crock pot. This time I poured everything into the pot without draining the liquid out of the cans first... if you choose to drain them, you'll need to add more sauce/water at the end. (As a side note, Aunt Shi, Del Monte and Hunt's offer low- or no-sodium cans of veggies and sauce! Or, if you have a garden, you can always use your own veggies :)) Add spices and stir.


Add your fresh veggies to the pot and stir. Finally, put the ground beef in the pot and stir. It will probably need some more liquid, so I usually add about 1/2 can more of tomato sauce and a can of water (I use one of the veggie cans and fill it up with water). Make sure it's enough liquid to cover all the veggies and beef and stir everything in.

Set your crock pot on high and cook for about 4 hours, or until all of the veggies aren't crunchy anymore and the smell is making your stomach growl :D. Test it as it cooks, just to make sure it's the right flavor for your tastes :). Adjust the seasoning accordingly. I actually put the pot (it's removable from the part you plug in) in the fridge and I'll plug it in at lunch tomorrow so that it will be ready just in time for dinner :).

A few alternatives for this recipe are:
Hunt's low-sodium tomato sauce
Del Monte no-sodium-added corn/green beans
Ground buffalo/bison
Ground deer meat
Ground turkey?
Fresh onion instead of minced dried onion flakes

Basically, I highly recommend using the smell test. That's how I have come up with a lot of my favorite recipes. Your taste depends a lot on your nose, so you can't go wrong with smelling everything first! :) Just be careful with the cayenne pepper... you probably don't want to do a lot of sniffing with that :P.

This is a lot easier to make than it sounds... and it's great to make ahead and leave in the crock pot so that you don't have to worry about cooking dinner after work. Please let me know if you make it and how you like it! I've made it quite a few times and have always gotten great reviews! :)

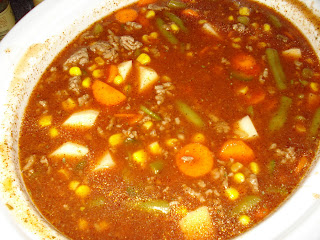
Here's what it should look like right before you start cooking it:


It looks even more yummy when it's ready to eat! Anywho, good luck and enjoy! :)

Wednesday, June 24, 2009

Chicken Enchiladas

This is a very simple recipe to make... and one that tastes good too! I have a couple of different chicken enchilada recipes, but this one is always fun to make because it has green sauce :).

To find the recipe, just look for the can of green enchilada sauce... I think it's Old El Paso brand, and the recipe is on the back of the can.


Here's the cream cheese/chicken/chile filling:


This is right before I put them in the oven. Jason likes lots of cheese, so I loaded them up :)


I guess I didn't take a final picture. Hmm... maybe we ate them too fast and I didn't get a chance. Anyway, they're yummy! Try them out sometime :).